Showing posts with label Home Decor. Show all posts

Thursday, September 20, 2012

The Sunroom: Phase I

September has been a whirlwind and I keep waiting for the dust to settle so I can get back to normal things - like updating this blog :)  Things still aren't completely settled - back-to-school anxieties are still running pretty high around here.  But I've been trying to write this post for months already and now is the time!

In the spring Erik was ready to start a new house project.  We decided the sunroom would be a good place to start since it was one room that wouldn't be affected by the renovations and adding-on that will be happening over the next year or two.  After the budget facelift on the kitchen last fall I was ready to make another room a little more pretty.


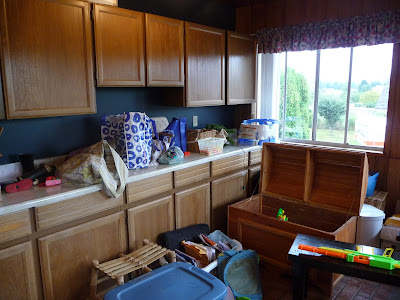
This was the sunroom the day we moved in about a year ago:  stained cedar walls, brick floors and some country-style window treatments.  We decided to use this space as our dining area for the time being since the table Erik built wouldn't fit anywhere else in our living space.


There were windows on 3 sides of this room and a bank of cabinets on the 4th wall.  Initially I thought we would maybe get rid of the cabinets but I quickly learned that cabinets are really... well... practical.  They have quickly become home to our craft supplies, extra grocery items, photo albums, etc.  And without a lot of storage space and no garage space (there's lots of storage in the garage and shop so I'm referring to in-house storage), it's also become a place for cat food, extra batteries, light bulbs and all those other random things that just need to get put... SOMEwhere.

This photo was taken a couple of months after we moved in...  After we had made the single-best purchase of home improvement so far:  the dishwasher.  There was no place to put the dishwasher in the kitchen (which is in the next room) and for some reason they actually had the plumbing hookups in the wall here.  So, this is the dishwasher's temporary home.  When we renovate our kitchen someday, the dishwasher will move back there and we will replace this hole with the original cabinets.


When deciding what we were going to do with this room, Erik and I were a little divided.  We both have a bit of a rustic style, but I prefer a fresh, bright, white-on-white cottage-feel while Erik prefers a dark wood log-cabin feel.  So, we decided to compromise by painting the walls and cabinets white and then introducing some wood elements back into the room for a little contrast.

The first step was prepping the area to be painted with Erik's paint-sprayer. We removed the cabinet doors to be sprayed separately.


This was after the first or second coat.  It was already feeling so much brighter in there and it made me love our old farm door even more...
  

And what would a home-improvement project be without a couple of little helpers?


After the walls and cabinets were white-i-fied, it was time to introduce the wood tones.  First Erik used a log to create his own moldings, which he stained.


He also built this custom countertop.

  
Erik still plans to strip and re-stain this door since it's not quite the same wood tone as the rest of the room.  Also, Elissa (among others) convinced us that the herringbone brick floors were amazing and shouldn't be changed.  I'm glad we listened.  


Overall, I'm happy with how everything turned out.  Erik still plans to do some wood ceiling beams with pot lights.  That will probably be a project for this winter...


We decided to take out the 2 small upper cabinets that were in the middle and replace them with some open shelves.


I love how the cabinets look now that they're painted since they have a bead-board pattern.  I'm still debating about whether to buy some handles and knobs for all the doors and drawers.


My future plans for this room include moving the dining furniture out (we hope to make space for it in the renovated kitchen) and make this into a cozy sitting room.  I'm envisioning an area rug and some mismatched chairs and couches to bring in that rustic cottage/cabin feel.  Maybe something a little like this:


or this:


or even this:


However, for now it serves it's purpose as our dining room, litter box/kitty-feeding area, mudroom, and storage unit among other useful things...

Wednesday, November 16, 2011

While We're on The Topic

Of home improvements, that is.

Here's a couple other minor (but kinda major for me) improvements that have taken place over the last while...

Some of you might remember the lovely artwork that the previous owners left us to cover the gaping hole of the fireplace in the living room. If you don't remember, no worries, you know I've got a picture to remind you.


Here's a close-up in case you couldn't get a good look with all those moving boxes in the way.


Well, it got a bit of a facelift by way of some white paint and a roller. I took a moment to appreciate the artistic work that went into the custom made half-circle. But it was a brief moment. And after a couple of coats of paint I felt so much better about displaying it in the fireplace hole.


By the way, this room has the same paint colour that was here when we moved in, but it looks so much better with the repainted board and some different accessories. I'm definitely ok with this colour (and not looking to do any more brick painting in the near future, thank you very much).

Unfortunately as of a few days ago, that same fireplace hole is now filled with a big old ugly piece of styrofoam. With the colder weather, we're discovering many areas of heat loss in our house - this being one of them. The good news is, styrofoam boards don't come in floral painted designs. So, it's white.
I can live with white.

And I realized that I never gave a proper before and after of our sun room - which serves as our dining room.

Before:


After:


I've heard lots of positive comments about the floor and I've definitely come to appreciate it. I just don't love all the wood tones going on in this room. I would love to paint the paneling out someday. I also have had my eye on some white chairs for our dining room table (that Erik built himself). Right now we're using Erik's parents chairs since they don't have room for them in their own living space.

And along the interior wall of the sun room, we have this bank of cabinets and countertop. Not super stylish by any means, but on the other hand, VERY functional. These cabinets are packed with stuff.

Before:


After:
Please don't overlook the most significant improvement to this room, perhaps the most significant improvement to this house... well, for sure the most significant improvement to the sanity and mental well-being of the mother and main kitchen cleaner-upper in this house! Yep, that would be the lovely stainless steel dishwasher.

So pretty. And so, SO helpful.

Wednesday, November 09, 2011

Kitchen Reveal (better late than never)

The kitchen is officially complete!


The makeover had a hesitant start and was met with much opposition (ahem, my husband), but I pushed forward, finding encouragement from those who assured me that they would do the same if they were in my shoes (Rosanna, Andrea, Elissa... thank you!)

I've been itching to share pictures but have been waiting oh-so-patiently until the makeover was totally complete. Finally, I am ready to share the finished product!

First, let's jog our memories and look back to what the kitchen was like when we first moved in...


On first appearance, most people were pleasantly surprised by the original kitchen. The white cabinets are pretty and the space is big. And for this reason, even I was hesitant about whether I should really go to all the effort of painting. But, upon closer inspection you would see that the paint colour on the walls (and above the cabinets) had a bit of a pink-ish hue, while the brick backsplash gave an 80's vibe to the space.

The whole jagged-toothed grin from the fireplace-wall was anything but welcoming.


And a close-up of the brick. Just because.


And we can't forget the red wall. I tried to pretty it up by putting my little knick-knacks up on that white shelf, but it wasn't really helping. The fire extinguisher to the right of the closet wasn't doing much for the space either. Erik and I agreed we could still have it close enough to be safe without having it bolted to our kitchen walls.


So, I took a deep breath and the project began. Erik strongly suggested that I should prime the brick before painting it. I questioned him on this slightly, especially since the bricks had already been painted (which meant I wasn't dealing with raw {and porous} brick). But, being the submissive wife that I am, I acquiesced.

I can't remember how long I painted that first night. All I know is that I zoned out while listening to the movie Julie & Julia playing in the background from the other room.

And I wasn't getting very far.


I was still working at getting into a good brick-painting rhythm at this point - how much paint to get on my brush and exactly which wiggling technique would work best for getting in between all those deep grout lines. About 1 hour in, the fingers on my right hand were starting to cramp.

The next day I continued on for awhile and was getting more and more overwhelmed at the realization that I was going to be painting these bricks THREE times over - with 1 coat of primer and 2 of colour...

So, that's when I made an executive decision. I informed Erik that, whether he agreed with me or not, I was only going to prime the black bricks. I figured the other bricks were light enough to go without primer, and because they had been previously painted, they would take the paint better. And even though it wouldn't have mattered (because my mind was already made up), I was thankful that Erik agreed.

That meant that my priming was almost done. I only had a little more black left on the main fireplace wall, and just one row of black bricks around the kitchen in the backsplash.


So, with priming complete, it was time to move on to colour. In my original post, I was pretty confident I would go ahead with Oriental Ivory on the walls, but I decided to take Elissa's advice and put the paint chips up against my cabinets for a day before deciding. It definitely made a difference, and after doing this, I realized I preferred Shadow Dream after all.


As the first coat of colour went on the brick backsplash, I was feeling excited and optimistic. Anything was an improvement over the splattered beige and salmon I was dealing with. And my brick-painting skills were improving - I knew just the amount of paint needed on my brush and I was perfecting my wiggle-the-brush-in-the-grout-line technique.


But as the colour dried and darkened, I had that sinking feeling of just really not liking it. At all. It was like mint ice cream. A lot of mint ice cream. And the colour looked even more intense on the backsplash because it was under the shadow of the cabinets. It seemed a little tacky (which, by the way, was not the look I was going for). I went to bed feeling discouraged and wondering whether tinting the colour lighter for the second coat would make it look better.

The next day the family was at our place for Thanksgiving dinner and my sister-in-laws helped me determine that white on the backsplash would be a better choice. Luckily, I had a half-can of off-white on hand that matched the creamy cabinets almost perfectly. So, another deep breath and I began to paint over all my hard work from the day before. Erik thought I was totally nuts at this point. But, once again, my mind was made up. And as soon as I saw the white going over top of the mint ice cream, I knew I had made the right move.


I wasn't sure what to do about all the brick on the fireplace wall, but since it was already half-painted in Shadow Dream I really didn't have the courage to change it at that point. I figured, if anything, I would paint all the walls with Shadow Dream for the first coat and then lighten my paint (perhaps by mixing the white and Shadow Dream half and half) for the second coat.

When it came time to roll paint onto the flat wall sections (which, by the way, felt incredibly fast and easy after painstakingly brushing all that brick, let me tell ya...), I fully expected to get the same mint ice cream feeling. But, as it dried, I actually really liked it. It was totally the soft and creamy blue-green that I had been hoping for from the beginning. It made me realize how different the exact same colour can look on 2 different surfaces.

Here's a comparison picture of Shadow Dream on the bricks and on the adjoining walls. Don't they look like 2 totally different colours?


One small time-saver that we discovered as the project evolved was that if we focused on only painting the grout lines with a paintbrush, we could roll the surface of the bricks with a thick roller (the kind used for textured ceilings - don't ask me for the technical name). But the best discovery was that, in the end, primer on the black bricks and only ONE coat of colour on all the fireplace wall bricks was all that we needed! What a relief after imagining the hand cramping that would've ensued from three tedious coats...

But, even with the extra work that I saved, I was still pretty done with the whole brick-painting saga. I admit there is a teensy tiny part of me that still wants to go back and paint the fireplace wall in the creamy white to match the backsplash... But, I'm drawing the line. Because if we end up renovating this house, I expect this wall will be one of the first to go.

And, much to his credit, Erik changed his tune and totally jumped on the kitchen-painting bandwagon. And he was very helpful despite his initial hesitance. He even dismantled the gas fireplace and repainted the whole thing in black.


In fact, after all was said and done, he may or may not have suggested that some new baseboards would really finish the space off well. Yep. I called it from the start. He couldn't resist the home improvement vortex.

The red wall transformation was definitely the easiest and fastest part of the process, but I think it was also the highest impact. The whole room felt instantly bigger and brighter. But that one wall stood empty and stark until this week. I was waiting for Erik to make me some coat hooks. I wasn't expecting anything too fancy - just some flat moulding with some hooks screwed on. But Erik took it a step further and fashioned these babies for me.


They look almost too pretty to hang stuff on.


And even though Erik warned me not to take any pictures until he could cover the screw holes, I did anyway. (Seriously, how many of you didn't notice those little screw holes until I mentioned them just now??)

With the rest of the wall, I debated putting up a frame gallery, but in the end I had Erik put up the white IKEA floating shelf that we already had.


I found a few things around the house to stick up there, including a picture of Micah and Keziah's feet that my sister took a few years ago. And my new favourite idea from Pinterest - putting pretty scrapbook paper into white frames. I would love to find a wallpaper in this pattern!


So now, after that very lengthy preamble, here is the kitchen before and after!

Before:


After:


Before:


After:


Before:


After:

Tuesday, October 11, 2011

What I Did Last Weekend (Point Form)

1. I had a birthday.


I turned 32 on Friday. In this stage of life, birthdays pass by in a blur, a busy day among every other busy day... But it was good - and special "luve" notes like this one from Micah made it extra special :)

2. I painted. A lot.

The kitchen project isn't quite finished yet. But it's getting close!
And on a side note, I totally sucked Erik into the painting vortex (just as I predicted!).

More pictures will come, but here's a glimpse of how it's been going:


After painting the backsplash in the blue-green colour I had chosen, I didn't like it at all and thought it looked pretty tacky. So, I painted over it with an ivory to match the cabinets. I'm still planning to paint the other walls in the blue-green but haven't felt totally happy with the colour choice. Anyway... I'll have to devote a whole separate post to that once it's all complete!

3. I pulled out the potty.


Let's just say a certain little boy is getting over his fear of the potty and a certain mommy is getting over her chronic procrastination... There has been no success yet, but there also hasn't been much time devoted to this. Hopefully soon I can put my energy towards this next endeavour...

Maybe when the painting is done.

4. I ate turkey.


We hosted the Toews family Thanksgiving dinner at the farm on Sunday night where we all squeezed into our sunroom-slash-dining-room for turkey and stuffing and pumpkin pie. And then we ended off with a bonfire to enjoy the rest of a warm fall evening. The perfect kind of evening where the grown-ups visit around the fire while the kids run around the yard, chasing cats in the barn and trampoline-jumping under the stars, and claiming they're not tired enough to go to bed even when 9 pm rolls around... Which makes us all thankful for holiday Monday to recover :)

Hope the rest of you enjoyed a happy Thanksgiving weekend!